Auto Update Website Footer Date with JavaScript
The Problem: Every year the footer of your personal or company website will need to be updated. It would be a waste of your time and you would risk breaking your code if you needed to update every single webpage to type “2020” in the footer of the page. This should be automated.
The Solution: Use JavaScript to get the date, set it as a variable, and display the result in the footer of the page.
<script type="text/javascript"> //Declares the JavaScript

   let d = new Date(); // Creates a variable and calls Date Object

   document.write(d.getFullYear()); // Calls getFullYear method on variable d(new Date() Object) and displays year

</script> // Closing bracket
The code above can be copied and pasted into the footer of your website pages. If you have a couple of static pages, it isn’t a big deal to edit each page. In my case, I added the code to the footer.php file for my custom WordPress theme. WordPress automatically appends the footer.php to every new post or page that I create. Now a user will always see a dynamically generated date at the bottom of the page.
Food Inventory
The Problem: Opening and digging through a smaller chest freezer. Also, need a way to keep track of food inventory for quarantine.
The Solution: A database accessible from my phone to add, remove, update, or delete items. At the grocery I can see what I have or don’t have at home.
| Count | Item | Brand | Ounces | Category | Location | Updated |
|---|---|---|---|---|---|---|
| 1 | Stuffed Shells | Tallutos | 16 | Other | Downstairs Freezer | June 26, 2020 |
| 1 | Marinara Sauce | Ray | 16 | Other | Downstairs Freezer | June 26, 2020 |
| 1 | Blueberries | Generic | 16 | Fruit | Downstairs Freezer | June 26, 2020 |
| 1 | Pineapple | Generic | 16 | Fruit | Downstairs Freezer | June 26, 2020 |
| 1 | Strawberries | Generic | 16 | Fruit | Downstairs Freezer | June 26, 2020 |
| 4 | Butter Unsalted | Generic | 4 | Dairy | Downstairs Freezer | June 26, 2020 |
| 1 | Crab Cakes Mini | Omaha Steaks | 15 | Fish | Downstairs Freezer | June 26, 2020 |
| 2 | Butternut Squash | Generic | 16 | Vegetable | Downstairs Freezer | June 26, 2020 |
| 1 | Pork Shoulder Picnic | Generic | 144 | Meat | Downstairs Freezer | June 26, 2020 |
| 1 | Chicken Cacciatore | Ray | 16 | Meat | Downstairs Freezer | June 26, 2020 |
| 2 | Chicken Thighs Boneless | Generic | 25 | Meat | Downstairs Freezer | June 26, 2020 |
| 1 | Corn Dogs Mini | Generic | 16 | Meat | Downstairs Freezer | June 26, 2020 |
| 1 | Bacon Applewood | Hatfield | 16 | Meat | Downstairs Freezer | June 26, 2020 |
| 1 | Ham Diced | Generic | 12 | Meat | Downstairs Freezer | June 26, 2020 |
| 1 | Beef Bone Broth | Kettle and Fire | 16 | Other | Pantry | June 22, 2020 |
| 1 | Cream of Celery | Campbells | 11 | Other | Pantry | June 22, 2020 |
| 2 | Cream of Chicken | Campbells | 11 | Other | Pantry | June 22, 2020 |
| 1 | Vegetable Broth | Swanson | 32 | Other | Pantry | June 22, 2020 |
| 1 | Chicken Broth Less Sodium | Signature Kitchens | 32 | Other | Pantry | June 22, 2020 |
| 2 | Chicken Broth | Swanson | 15 | Other | Pantry | June 22, 2020 |
OUT OF STOCK:
I customized the WordPress plugin “Participants Database” to Create, Read, Update, and Delete food items. Anyone can add items but a WordPress login is required to update or delete food items.
Add Navigation Dropdown Menus in WordPress with BootStrap v4
I decided to consolidate some of the links in my navigation bar at the top (header) of my site. This eliminates the need for individual web pages that are full of links. Essentially, you will get to where you want to go quicker with less scrolling. Mobile device users will appreciate this the most! They can quickly tap the drop down menu of their choice and then tap one of the links the drop down menu provides. I decided to create a drop down menu for my “work samples” link and for my “background” link. In my custom WordPress theme, the current navigation bar is located in the header.php file.
View the source code of a page with Ctrl + U. You will see the “Navigation” section of the page or you can refer to the pic below.

The area of interest here is the div with the “dropdown show” class. Another div drop down menu is located in this div container. The main link is set to “” so the browser will remain on the page if clicked. When clicked, three links will show up below and will be available to select. The two div containers are then closed. All of this is contained within a list class “nav-item” for BootStrap to change it accordingly.
The drop down menu is in effect and will look great on any device!
Migrate website to WordPress Content Management System
I migrated my website to the WordPress CMS (Content Management System) so it would be easier to add new web pages and I enjoy a good challenge. Beforehand, I would have to code each static page in HTML and style it to my liking. When there are only a couple of pages it is no big deal, but if you are constantly adding content to a website, it is quicker to use a content management system like WordPress, Drupal, or Joomla. Writers and editors that don’t know HTML, or just don’t want to deal with it, can hit the ground running and add new website content fast. In a nutshell, you login to your site and write your articles in the feature rich WordPress editor. It is easy to add media (e.g. pictures, videos) and arrange them however you like on the page. If you aren’t ready to post your article yet, you can save it as a draft and publish it later. This is great when an editor needs to proofread the article.
HOW DID I DO IT?
The first thing to do: Install WordPress to your web server.
*If you would like to work on it locally before making it “live”, you will need to setup a local web server (WAMP, MAMP, or LAMP) as I did. This will allow you to make changes offline. Otherwise, follow the directions below to setup to set it up online and edit your web site on the fly.
Some web hosts have a one-click setup from the administrative panel. If you don’t have this option, or want more options, download WordPress to your computer.
Unzip the downloaded file to a folder on your hard drive.
Make sure you have a database setup on your web host and take note of the credentials.
Edit the file wp-config.php and add your database information.
Upload WordPress to your web server via FTP.
Run the WordPress installation script by accessing the URL in your browser. (http://www.example.com/wp-config.php)
You now have WordPress installed on your web server and it can be edited at http://www.example.com/wp-admin
A standard HTML file has a header, content section, sidebar, and footer. A WordPress page, or post, pulls dynamic content from each section to create each web page in PHP. This eliminates redundant header and footer content, the pages will load faster, and they will rank higher on Google. The idea is to split up the content from one of my static web pages to recreate the structure and look of the original website.
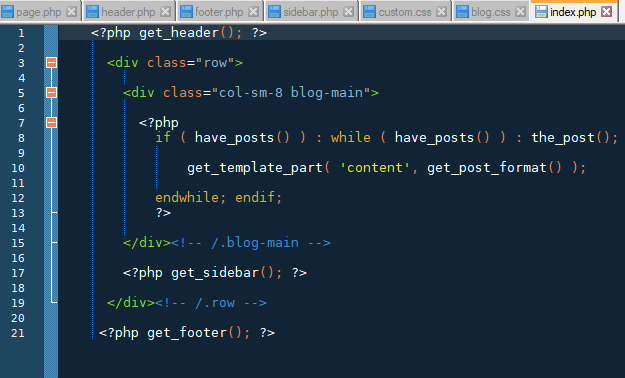
In the WordPress editor I created a page for each of my original web pages.
In addition, I applied my original style.css file to my custom WordPress theme. The navbar links to my pages needed to be changed to <a class=”dropdown-item” href=”/wordpress/index.php/examplepage”>. I installed WordPress in a subfolder on my domain (http://Ray-Sanchez.com/wordpress/) so I need to begin with “/wordpress/” in my links.
Images needed to be uploaded through the “Add Media” section of the WordPress editor and linked accordingly. I added the class “img-fluid” to each picture so that they would respond to different size devices.
About Me

A self-taught front end web developer who loves to travel, create things, solve problems, and grill! I enjoy the challenge of taking things apart, learning how they work, and improving them. I created this site to document and share what I've learned.